7 Foam Rolling Tips
The Benefits of Relieving Muscle Tension
Foam rolling can be very beneficial for relieving muscle tension. Just make sure you’re doing it correctly.
We are all probably familiar with a foam roller. It’s the long, dense tube-looking thing found in most gyms. But not many people use it regularly, or know its purpose.
Foam rolling is a form of massage called myofascial release. Let’s break that down that big word into something we can understand. Myo is the medical term for muscle and fascia is a connective tissue that surrounds muscles and organs. The fascia surrounding muscles can tighten and constrict the muscle—not allowing it to fully relax—we call them knots or trigger points.
Myofascial release gently stretches the fascia and releases the tissue. This allows the muscle to fully relax because of a principle known as autogenic inhibition. One perk of foam rolling is that you have the ability to apply pressure in precise locations, because you can feel what is working. It can be uncomfortable during the process but the benefits are worth it.
Benefits of Foam Rolling
- Muscle tension relief—Macdonald et. al., measured the effects of foam rolling as a recovery tool after exercise-induced muscle damage. The foam roll intervention consisted of two 60-second bouts on the anterior, posterior, lateral, and medial thigh. Foam rolling reduced subjects’ pain levels at all post‐test points while improving post‐test vertical jump height, muscle activation, and joint ROM in comparison with the control group.
- Increased range of motion (ROM)—One study measured hip ROM after a prescribed intervention of foam rolling. The experimental group foam rolled for three, one‐minute bouts, with 30 second rests in between. The control group did not foam roll. The authors found a significant increase in hip extension ROM during the second session in the experimental group. However, if the participants stopped foam rolling, they lost the increased ROM after one week (Cheatham et. al., 2015).
- Increased neuromuscular efficiency—This is the ability of the nervous system to properly recruit the correct muscles to produce a force in all three planes of motion (Clark, et. al., 2012). In a study looking at foam rolling, ROM, and muscle efficiency, they found that both durations of roller-massager application increased neuromuscular efficiency during the lunge when compared to the control. They also found that the 60 seconds of roller massaging enhanced muscle efficiency more than 20 seconds of roller massaging did (Bradbury-Squires, et. al., 2015).
7 Foam Rolling Tips
-
Hip flexors
Start face down on the floor with both thighs on the roller and forearms propping up your torso. Roll up two inches, then down one, spending extra time on any knots or trigger points. Continue until you hit the entire front side of your thigh, about one minute per leg.

Hip Flexors
-
Hamstrings
Start in a seated position with both thighs on the roller, hands propping you up by your sides. Next, roll out the hamstrings from the knees to the hamstrings, increasing the pressure by lifting one thigh off the roller.

Hamstrings
-
IT Band
Lie on your left side with the outer thigh on the foam roller and left forearm propping up the torso. Roll between your knee and hip, taking extra time on any tender areas. Too much pressure? Plant the top foot on the ground to reduce some pressure. Continue for one minute then switch to the other side.

It Band
-
Glutes
Sit with the right ankle crossed over the left thigh, and plant the left foot firmly on the floor with hands propping you up by your sides. Next, roll the body forward and back, hitting all parts of the glutes. Roll out each side for one minute, applying extra pressing on any knots.

Glutes
-
Calves
Sit with legs extended, right ankle on the roller, hands propping you up by your sides. Cross your left ankle over the right and roll the body forward and back hitting the entire length of the calf muscle. Be sure to work the inside and outside, too! Roll for one minute and switch legs.
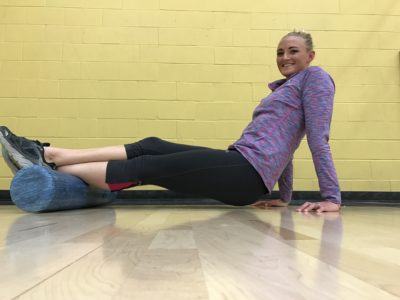
Calves
-
Upper back
Lying on your back with knees bent and roller under you shoulder blades, fold your arms across your body. Engage your core and raise the hips up off the ground. Maintaining the head and neck in a comfortable position. Spend one minute rolling up and down the upper to mid-back, until the muscles relax.

Upper Back
-
Lats
Start lying on your right side with the foam roller under your armpit and the right arm extended flat on the floor. Place your left arm down in front of you for balance and begin rolling up and down your lat muscle. After one minute repeat on the other side.
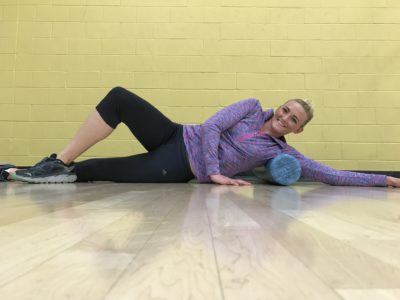
Lats
Life Tip
Don’t roll out your lower back or neck with a foam roller. Instead try stretching in child’s pose or gently massaging your lower back with your hand or a lacrosse ball. Foam rollers are intended to be used over dense muscle tissue, avoid any boney joint or structure.
How long should I wait in between foam rolling sections?
It is important to let your muscles rest and recover after you’ve foam rolled. Wait 24–48 hours after a foam rolling session to roll out that same area again. Foam rolling is a great recovery tool. It’s important to remember to listen to your body. If you keep feeling a tweak or twinge somewhere for more than a few days to rest and it might be time to go see your physician.
Thats great! I do a method of foam rollling called Melt. I notice that the pictures above are with a Melt Roller. 🙂
Viola Crebs