![]() Even if you aren’t using it, by now, you’ve probably at least heard of Facebook.
Even if you aren’t using it, by now, you’ve probably at least heard of Facebook.
The world’s most popular social networking website/app makes it easy to connect with people online. But getting started can be daunting, so we’ve created a guide to help you create your own profile and get the most out of Facebook.
Creating an Account
- Go to facebook.com on your computer or download the app on your mobile device or tablet. It is easier to set up an account from a computer, using the Web, than by creating one on a device.
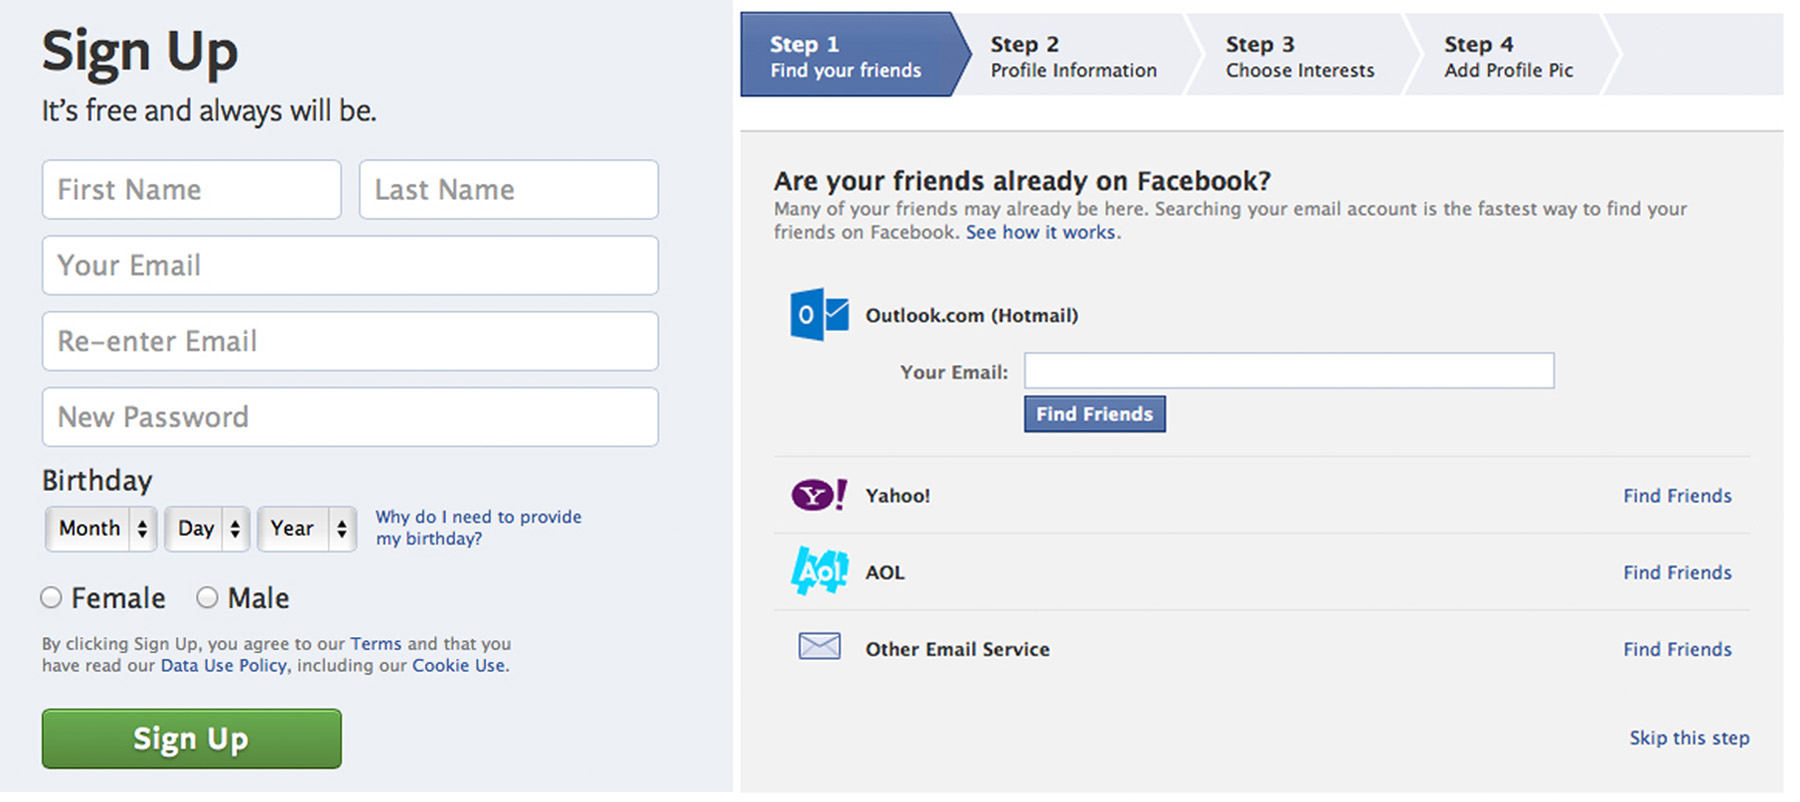
- Enter your full name, email address, birth date and password.
- After you’ve entered your information, click “Sign Up.” You may also need to complete a security challenge before you can proceed.
- Facebook will now take you through four setup steps — finding your friends, profile information, choosing interests and profile picture. You can skip any or all of these steps and provide as much or as little information as you want. You can make adjustments to all of these whenever you see fit.
- Once you have completed or skipped the setup steps above, Facebook will take you to your “Welcome” page. This page gives you the opportunity to complete any of the above steps or you can move on.
- At this point, Facebook will send a confirmation email to the email address that you provided. You must confirm your email address before you can access all of Facebook’s features. Log in to your email and follow the confirmation instructions sent to you by Facebook.
Key Terms
- Homepage: All of your friends’ recent posts and activities are displayed here via the News Feed.
- News Feed: This is where public messages (updates) from your friends appear. If you “Like” a page, its updates will appear here as well. This gives you a quick look at what your friends have been doing on Facebook.
- Timeline (aka Profile page): This is where information about you is stored. Whenever you post an update, it appears right on your Timeline. Your friends can also share posts on your Timeline. You can control who sees what via privacy settings (see below).
- Friends: Friends are people you connect and share with on Facebook. When you create a Facebook account, Facebook will suggest friends. Someone must accept a friend request before you can see their full profile.
- Update: This is a short message, photo or video that you post to your Facebook Timeline. Many people refer to it as “updating your status.”
- Like: Clicking “Like” on a person’s post is a way to give positive feedback and connect with things you care about.
- Tags: A tag is a way to identify people on Facebook by posting their name and a link to their Profile. This is done by typing the @ symbol before a name (@USANA Health Sciences). Your friends can tag you in photos and videos, as well as other posts, including status updates. Anyone who can see those posts will then be able to click the tag and see your public information. The tagged post will also be visible on your Timeline and News Feed you can change this via privacy settings). Pages like USANA Health Sciences cannot tag individuals, only other pages.
- Business/brand page: These look similar to personal timelines but offer unique tools for connecting people to a topic — business, brand, organization or celebrity. Pages are managed by admins who have personal timelines. Pages are not separate Facebook accounts and do not have separate login information from your timeline.
- Liking a business page: If you want to follow a particular business or brand you can “like” them. That will make it so their posts show up in your News Feed.
Finding Your Way Around
Now that your account is set up, you’re ready to start using Facebook. One thing to keep in mind is that the Web version and app versions of Facebook look and behave a bit differently. The good news is Facebook is working to make them all the same. In the meantime, we’ll provide as much information as we can to clear up the confusion.
News Feed Web Version

- Notifications: This is where you’ll be notified about friend requests (when someone requests that you add them as a friend), messages (when someone sends you a private message) and general notifications (when someone likes you status or tags you in a post or picture)
- Home: This will always bring you back you your News Feed.
- Timeline: This will always take you to your profile page.
- Privacy: This takes you directly to privacy shortcuts.
- Settings: This is where you can make account changes. It also takes you to privacy settings.
- Navigation: Here you can view and navigate to Facebook’s core features, including your lists, groups, and apps. If you choose to create a separate business profile, you can also access it from here.
- Publisher: This is where you post status updates, pictures and links to stories. Once you click “post,” that information will show up on your Timeline and the News Feed of your friends.
- Feed: Updates appear here.
News Feed App Version
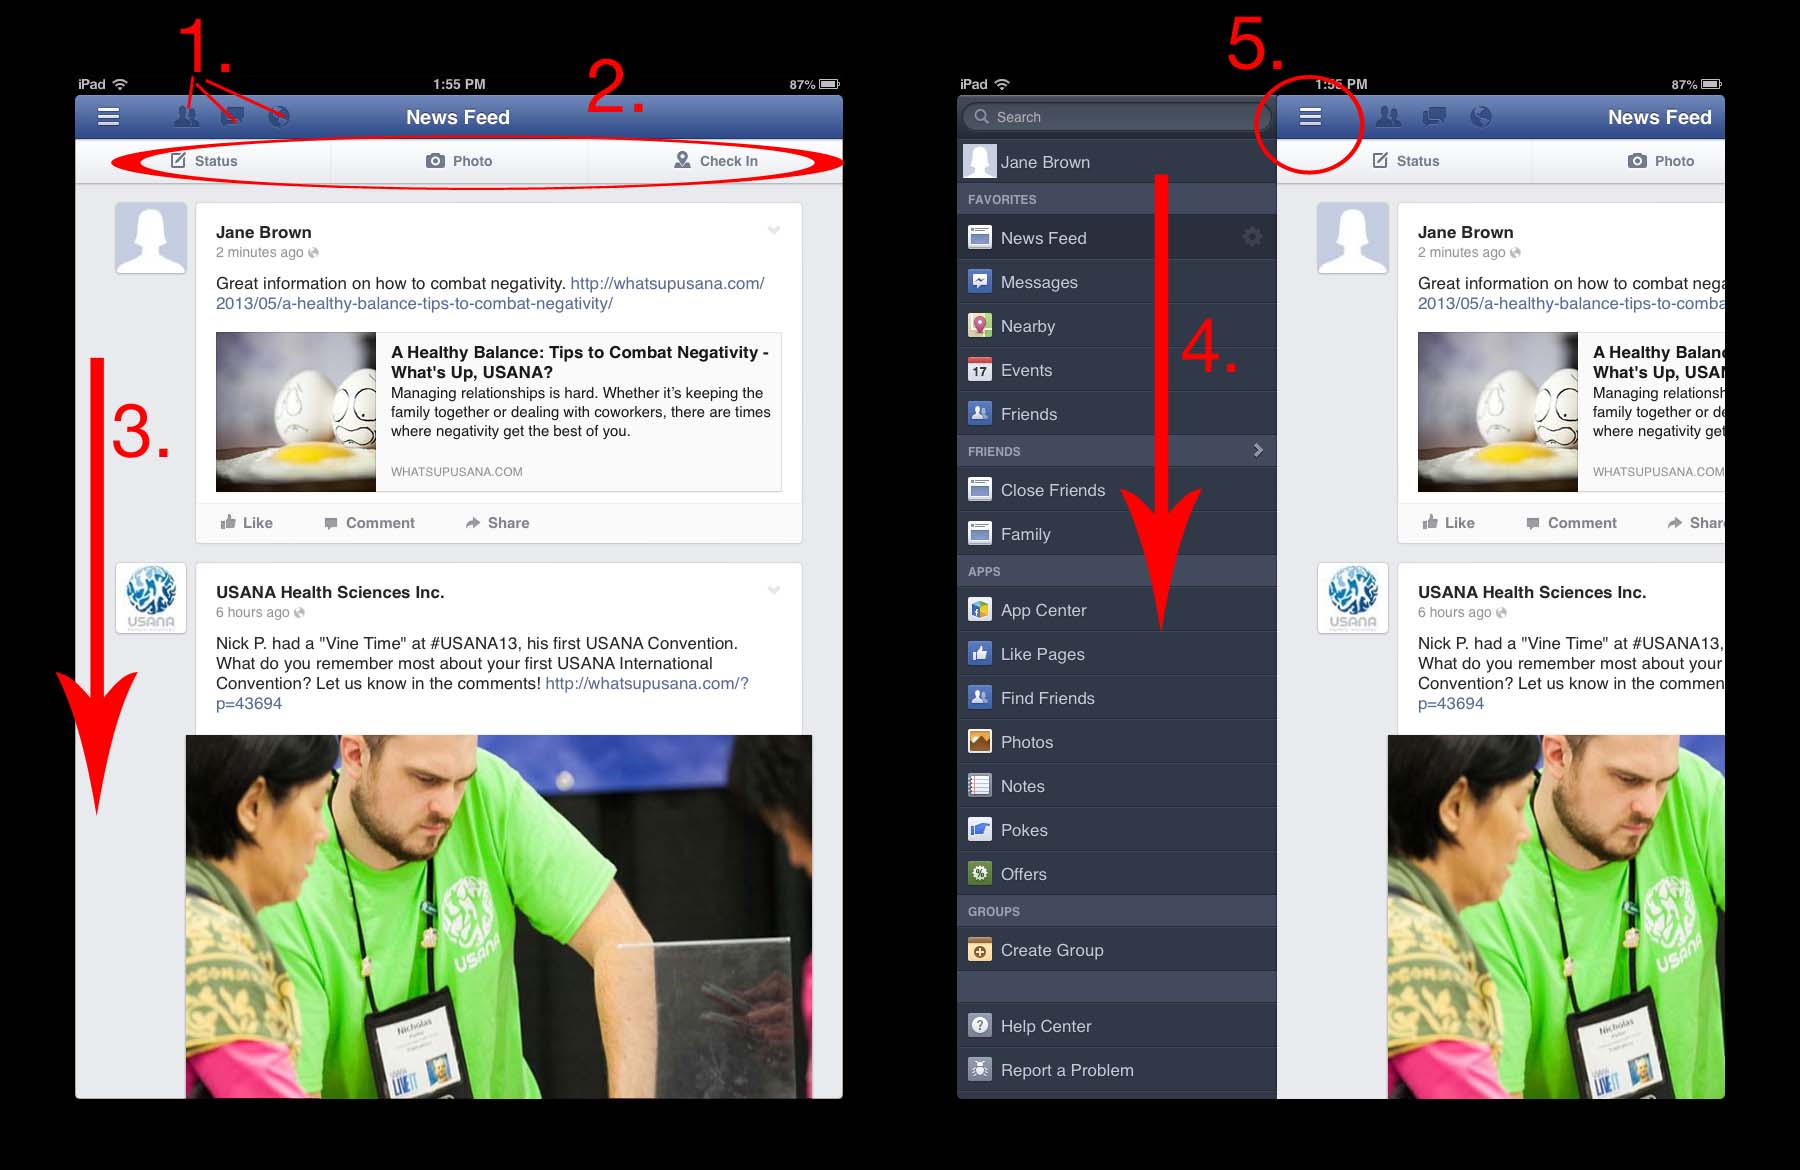
- Notifications: This is where you’ll be notified about friend requests (when someone requests that you add them as a friend), messages (when someone sends you a private message) and general notifications (when someone likes you status or tags you in a post or picture)
- Publisher: This is where you post status updates, pictures, links to stories and check in with locations. Tap on the preferred action to begin your post. Once you tap “post,” that information will show up on your Timeline and the News Feed of your friends.
- Feed: Updates appear here.
- Navigation: Here you can view and navigate to Facebook’s core features, including your lists, groups, and apps. Tap your name to access your Timeline (profile). If you choose to create a separate business profile, you can also access it from here.
- Navigation Access: Tap these three lines to make navigation appear. Tap again to return to your feed.
Profile page
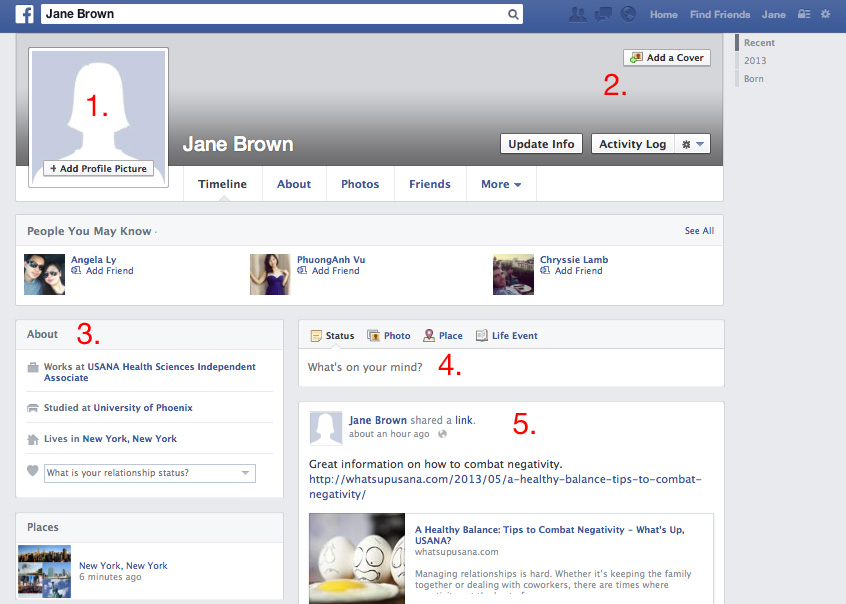
- Profile Picture: This image represents you whenever you post anything on Facebook. You can change your picture any time by hovering your mouse over the photo and then clicking “edit profile picture.”
- Cover Image: This is a large picture that should expresses your personality or interests.
- About You: This is where you’ll share details about your work history, relationships, interests, etc. When you are filling in the information, you can choose who can see it (see privacy settings below).
- Publisher: In addition to publishing status updates via your News Feed, you can also post from your Timeline.
- Timeline: This is where information about you is stored. Whenever you post an update, it appears right on your Timeline. Your friends can also share posts on your Timeline. You can control who sees what via privacy settings (see below).
 Privacy Settings
Facebook gives you the option of sharing as much or as little information as you want. You need to decide what works best for you.
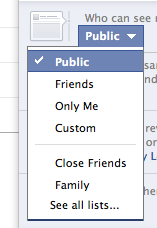
- To find privacy settings, click on the lock in the top, right corner of the screen.
- There are a number of privacy options, including “public,” “friends” and “custom” options. When adding personal information or even creating posts, you will see a dropdown menu from which you can choose whom you want to see your information. All future posts will be shared with the most recently selected audience unless it is changed again.
- Facebook updates privacy options regularly. Make sure you check your settings to ensure they are set the way you want them to be.
Account Settings
Once you start using Facebook, you may need to modify your Account Settings. These settings control your password, notifications and more. Changing these settings is optional, and you can modify whenever you choose. Explore these settings to determine what works best for you.
Creating a Business/Brand Facebook Page
If you’ve attended any social media training sessions, chances are you’ve heard about creating a business/brand page. Pages help you connect with other people similarly to the way you connect via a personal profile. What makes them different than personal profiles is anyone can view them. By simply “liking” a page, a person can see all the page’s posts in their personal News Feed (they don’t need to be friends with you in order to like your page).
Many USANA Associates prefer to create a separate business/brand page so as not to bombard their friends with all things USANA (or, vice versa, to avoid sharing personal updates — what you ate for breakfast — with potential business contacts).
While you may think setting up a separate page may add to your workload, it actually isn’t too difficult. In fact, you can create and manage a Facebook Page from your personal account. Setting up a page is very similar to setting up your profile.
Whether you opt for simply a personal profile or for a profile and a business page, please follow USANA’s compliance guidelines (for additional information, please visit the Digital Downloads page).

USANA’s business/brand page
Still have questions about Facebook? Visit the Facebook help center.
We’re proud to bring you the freshest content on the web! Follow USANA on Twitter, like our USANA Facebook page and enjoy the latest videos on the official USANA YouTube channel.
 Learn what USANA is doing to make the world a better place.
The future of personalized health and nutrition is now available with USANA’s True Health Assessment.
Leave a Reply
Want to join the discussion?Feel free to contribute!